In this guide, we’ll walk you through how to add a printer to your laptop, what to check before starting, and step-by-step methods to connect your printer, both wired and wirelessly.
Things to Check Before Connecting a Printer to a Laptop
Before you begin the setup, make sure these things are in place:
Check printer compatibility: Ensure your printer supports your laptop’s operating system (Windows or macOS). Most modern printers work with both.
Install necessary drivers: Many printers automatically install drivers when connected, but older models might need manual driver installation from the manufacturer’s website.
Power on your printer: Make sure the printer is plugged in and turned on before you try to connect.
Have the right cables or connection type ready: For a wired setup, ensure you have a USB cable; for wireless, connect both your printer and laptop to the same Wi-Fi network.
Check ink and paper: Before printing, ensure your printer has sufficient ink or toner and loaded paper.
Methods to Connect a Printer to a Laptop
There are several ways to connect a printer to a laptop, depending on your printer type and the connection options it supports. Let’s go through each method in detail.
Method 1: Using USB Connection (Wired Setup)
This is the easiest and most common way to set up a printer on a laptop, especially if you have a plug-and-play printer-laptop combination.
Step 1: Plug one end of the USB cable into the printer and the other into your laptop’s USB port.
Step 2: Power on your printer. Most modern printers are “plug and play,” which means your laptop will automatically detect and install it.
Step 3: Wait for your operating system to identify the printer. If it doesn’t, visit the manufacturer’s website (like HP, Canon, or Epson) and download the appropriate driver.
Step 4: Once installed, open your document, select Print, and choose your printer from the list.
This method is great for users who prefer stable and fast printing without worrying about network connectivity.
Method 2: Using Bluetooth Connection (if supported)
If your printer supports Bluetooth, you can connect the printer via Bluetooth without any cables.
Step 1: Turn on Bluetooth on both your laptop and the printer.
Step 2: Go to your laptop’s Bluetooth settings and search for available devices.
Step 3: When your printer appears in the list, select it and pair the devices.
Step 4: Once paired, open your printer settings or print dialogue box and select the Bluetooth printer to start printing.
Bluetooth connections are ideal for smaller setups or when Wi-Fi is unavailable, though they’re generally slower than USB or Wi-Fi connections.
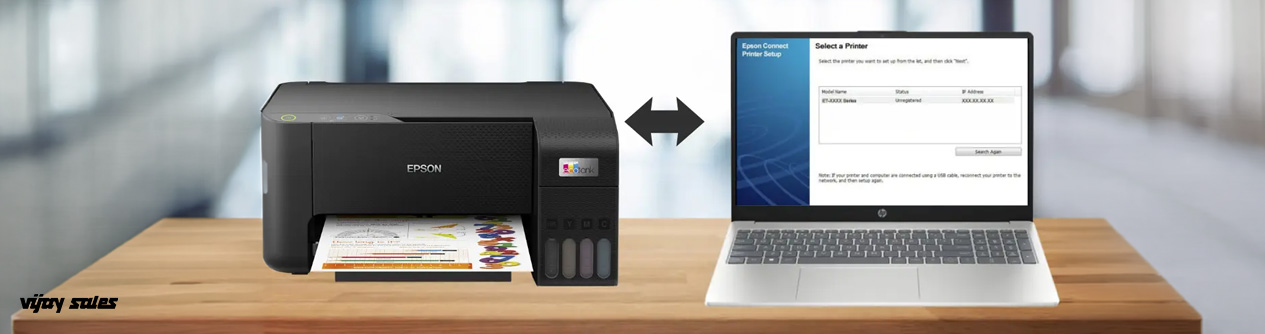
Method 3: Using Network/Ethernet Connection
If your printer supports Ethernet or Wi-Fi, you can easily connect a wireless printer to a laptop.
Step 1: Connect your printer to the Wi-Fi network (using its control panel or app).
Step 2: On your laptop, ensure you’re connected to the same Wi-Fi network.
Step 3: Go to printer settings and choose the option to Add a network printer.
Step 4: Select your printer from the available list, and your system will install the required drivers automatically.
Alternatively, you can use an Ethernet cable to connect your printer directly to your Wi-Fi router. This ensures a stable connection for high-volume printing.
How to Add a Printer to a Laptop for Windows OS
Here’s how to add printer to laptop running on Windows 10 or 11:
Open Settings: Go to Start → Settings → Devices → Printers & Scanners.
Add Printer: Click on Add a printer or scanner.
Select Your Printer: Windows will search for available printers (USB, network, or Bluetooth). Once your printer appears, select it and click Add device.
Install Drivers (if prompted): If Windows can’t find the drivers automatically, download them from the printer manufacturer’s website.
Test Print: Open any document and print a test page to confirm successful setup.
Windows makes it easy to connect a printer to a laptop, whether wired or wireless, thanks to automatic driver updates and built-in printer management tools.
How to Connect a Printer to a Laptop for Mac OS
If you’re using a MacBook, follow these steps to connect the printer to the laptop easily:
Go to System Settings: Click the Apple menu, then go to System Settings, then to Printers & Scanners.
Add Printer: Click the “+” icon to add a new printer.
Select Printer: Your Mac will detect nearby printers (USB, Wi-Fi, or Bluetooth). Choose your printer from the list.
Download Driver (if needed): If your printer isn’t automatically recognised, macOS will prompt you to install or download the correct driver.
Test Print: Open a document, go to File → Print, and select your printer to confirm successful setup.
macOS supports most popular printer brands and often installs necessary drivers automatically, making it seamless to set up a printer on a laptop.
Conclusion
Learning how to connect a printer to your laptop isn’t complicated it just depends on the type of printer and connection method you choose. For quick, stable printing, a USB connection works best. If you prefer mobility and minimal cables, opt for a wireless or Bluetooth connection. Modern printers are designed for ease of use, so you can print from anywhere in your home or office without hassle.
Whether you’re trying to connect a printer via USB or connect a wireless printer to a laptop, once you’ve followed these steps, printing documents, photos, or projects becomes effortless. With a bit of printer setup know-how, you’ll save time, improve efficiency, and enjoy smooth printing every day.


.jpg)

.jpg)

.jpg)


.jpg)


.jpg)


.jpg)


_.jpg)
_.jpg)